ANM220.1 Wk10

Since in our project we are using fire visual effects, I will be talking about how fire effects are created in movies. While for our animation we used a simple plug-in to achieve the desired effect,  VFX artists in the industry also have different methods for creating fire effects which I will be talking about briefly.

Below are several ways of creating fire.

1-Motion Graphics.
2-Tracking.
3-2D Animation.

There are several options to creating fire effects for other programs, the recommended and best option is to use a dedicated software but these are usually quite expensive so one of the alternatives is to use pre-rendered fire footage which sometimes works but is not always helpful as it may not give the desired effects or give a realistic result.


Often, fire is created in After Effects- a program everyone in the industry is familiar with. To create the fire, we start off by setting a tracker where the fire will emanate from, after setting the tracker on the area you want the fire to be, after your tracker has been set you end up by setting the tracker as a null object.
Now for the actual fire, there are two types of fire you would use which are the Torch and an effect fire. After the fire is inserted, it is turned into a null object, after that you puppet pin the fire to the position of the tracker, and then you start copying your layers to increase the fire’s density to the level you want it to become.
Next the timings are set and the fire layer is merged with the original tracker and footage you want the fire on. Finally, the fire layer is switched to screen mode to be used as an alpha.
References:

After Effects Tutorial: Realistic Fire effects. (2016, March 07). Retrieved April 15, 2017, from https://www.youtube.com/watch?v=05uKtxfYNDQ

Realistic Fire – Free AE Template. (n.d.). Retrieved April 15, 2017, from https://www.rocketstock.com/free-after-effects-templates/fire-in-after-effects/

ANM220.1 Wk09

In this blog post I will be talking about lights in 3Ds Max and highlighting its uses. Below are some of the main uses of lights in 3DS Max.
1- Improve the Illumination of a scene.

2-To enchance the scene’s realism through realstic lights.

3-Strengthen the realism by having lights cast shadows.

4-Cast projections.

5-Help the illumination of a model’s scene such as a flash light.

In the lights option we have several types of standard lights which consist of :

*Target Spotlight.

*Free Spotlight.

*Target Directional Light.

*Free Directional light.

*Omni light.

*Skylight

The uses of each type of light are broken down below.

1.Target Spotlight:

The target spotlight is used to have it follow the target illuminating the target that you set the light on and trace that target, and it can also be used like a flash light for the model.

2.Free Spotlight:
The free spotlight is the same as target spotlight but their only difference is that in free spotlight you have no target and you can move your target light freely in a fixed area’s you want.

3.Target Directional light:

Target Directional lights are considered to be the sun of 3Ds max, which means that this light particually used to illuminate in a way the sun does.

4.Omni light:

The use of Omni light to fill in the areas that the original lights don’t reach, you can consider Omni light to be a back up light and that happens because the omni light illuminates in all directions but it comes from a fixed direction of light.

5.Skylight:

Sky light is quite simple yet helpful, with the help of sky light you can set the color of the sky and you have it as a dome covering up your scene.

6.mr Area omni light:

mr Area omni light’s spciality is in directing the light in a sphyrical or cylindrical volume, and the you set it would only appear if you render it using Mental ray render.

7.mr Area splotlight:

It is the same as mr Area omni light but the only difference they have is that instead of a sphyrical or cylindrical volume the, mr Area splotlight goes with the rectangular and disc-shaped area volume, and both of those lights shoulder be rendered on Mental ray, because if you use scanline it will be treated as a regular omni light.


ANM220.1 Wk08

Ptex is a texturing technique developped and used by Disney Animation Studios. It was first presented to the public in 2008 and the first animation to feature this technique was Bolt a year later in 2009. It has also been released as a free open source a year later (“UDIM UV mapping”, 2017). One of the key traits of the Ptex pipeline is that it eliminates the UV mapping process which is seemingly something out of every 3D modeler’s dream.

Contrary to the traditional approach of UV assignment, a separate texture is applied to each polygon face and a single Ptex file can store hundreds of thousands of texture images(“Ptex”, 2017). Not only does a Ptex map only take a few seconds to create but it also completely abolishes texture seams! (“Understanding Ptex – Is It the Future of Texturing?”, 2017) This methof works with rendering engines such as V-Ray, Mental ray and Render Man but is not supported by Mudbox or MARI, for example. It also requires the model geometry to be very tessellated otherwise resolution will be lost. Currently, Ptex has become more widely used by the movie industry but has not yet been integrated into the video game industry pipeline as everything is rendered real time.

Since Ptex requires you to paint directly on the mesh rather than in a separate program such as Photoshop, it might not be very beneficial for the creation of simple textures for video games. However, that is not to say that this method will not be utilised by the video game industry in the future and with the advancement of hardware, it may soon be eassily paired with real time rendering.


References

UDIM UV mapping. (2017). fxguide. Retrieved 13 March 2017,

from https://www.fxguide.com/featured/udim-uv-mapping/

Ptex. (2017). Ptex.us. Retrieved 13 March 2017, from

http://ptex.us/

Understanding Ptex – Is It the Future of Texturing?. (2017).

Pluralsight.com. Retrieved 13 March 2017, from

https://www.pluralsight.com/blog/film-games/understanding-ptex-is-
it-the-future-of-texturing

ANM220.1 Wk07

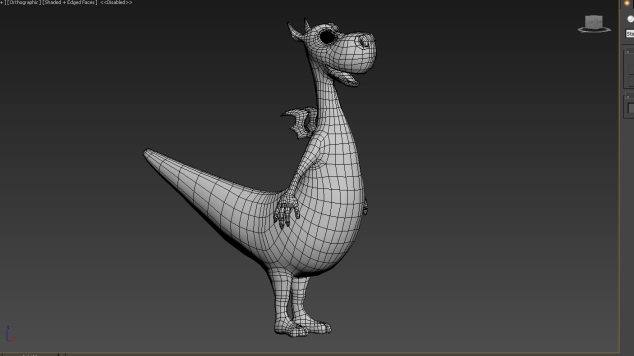
The mascot model that I have been working on is finally ready for unwrap and I am quite satisfied with how it turned out. I will mention some issues that I faced during the modeling process and how I handled them. Firstly, and as per usual, I was having trouble with the arm modeling. Originally, our character was designed to have three fingers but it was decided to model him with four to later facilitate the animation and visual style. I had to remodel the hands a few times as the topology wasn’t right. The head topology, however, came out well surprisingly, but I did have to tweak the area quite a bit to achieve the eye crease look. The wing design had to be altered to make it more realistic. I used images of bat wings for references to get the structure correct.

Screenshot (12).png

Although the model is seemingly simple, I tried to make is as clean as possible so it took some time to perfect. Since it is the main model of our animation, I felt the responsibility of dedicating enough time to make it look appealing and easy to work with.

ANM220.1 Wk06

In the last blog I talked about some of how the water was created in Disney’s Moana. Moana is a movie revolving around a Polynesian “princess” who sets on a journey to explore the oceans and save her island. As already mentioned, it is directed by the same people who made Aladdin and The Little Mermaid, who felt a necessity to give it the same artistic feel the 2D animations had, because unlike 3D, it doesn’t have any simulators and everything is made artistically, whereas 3D has plugins and hair simulators, so there’s no need to add any extra effects. Therefore, the team felt inspired to animate the hair as they would in an original Disney film.

Disney is known to have extremely realistic hair and fur in their movies, being among the most difficult tasks, this time they decided to take a different approach. With their new program, Disney aims to give Moana the feel of a 2D animated movie, so they made their own hair program.

Quicksilver (the new hair program for moana) combines rigging and grooming controls for freedom of artist-friendly posing, The animated hair in the 2D animations directors previously worked on were choreographed and they invented their own tool to allow for the same type of expression and artistic creativeness. “The greatest thing of hand-drawn is the expressiveness and the animators were happy to push it with tricks to break the CG and make it bend more,” Musker told IndieWire.

“Quicksilver is the engine dedicated to hair simulation. In the past, the animation department would provide a drawing of what it wanted the hair to do. With Quicksilver, it can now put the hair in a starting pose for scenes and let the engine handle how it moves around.” (“‘Moana’: 10 things to know about Disney’s most effects-filled movie ever”, 2017)

Desowitz, B. (2017). Meet the ‘Moana’ Producer Who Helped Disney Animate Female EmpowermentIndieWire. Retrieved 15 April 2017, from http://www.indiewire.com/2016/11/moana-producer-disney-animation-female-empowerment-1201742720/

‘Moana’: 10 things to know about Disney’s most effects-filled movie ever. (2017). CNET. Retrieved 15 April 2017, from https://www.cnet.com/news/moana-10-things-to-know-about-disneys-most-effects-filled-movie-ever/

References
Desowitz, B. (2017). ‘Moana’: How Disney Innovated Water and Hair for a Greater Hand-Drawn AestheticIndieWire. Retrieved 15 April 2017, from http://www.indiewire.com/2016/11/moana-disney-hand-drawn-aesthetic-1201749025/

}}, {. (2017). Wave of Animation: Disney’s Moana Ups the CGI AnteRedshift. Retrieved 15 April 2017, from https://redshift.autodesk.com/moana-animation/